AdAce
Quickly place multiple ads on your viral site by utilizing the Google AdSense program or any other kind of ad codes.
Migration from WP QUADS
From version 5.0 WP QUADS is being replaced by AdAce as the main ad plugin. AdAce has all the options that are found in QUADS and also adds some new features, like sponsors.
If you have WP QUADS active during the AdAce activation, then AdAce will import all the ads and settings from QUADS, with the exception of ad widgets on sidebars. After activating AdAce you can safely deactivate/remove WP QUADS.
CAUTION!
AdAce will NOT import ad widgets automatically (the ads themselves are imported). You will have to set them up manually in WordPress Admin › Appearance › Widgets.
Installation
The plugin is integrated into the theme so after theme activation you will be asked to install it. Or course this doesn't mean you have to use it. If you prefer other ads solution, feel free to use it. More info about switching to other ads plugin can be found below.
Updates
The newest version of the plugin will always be shipped with Bimber updates.
Setup
After activating the plugin, its configuration page will be accessible from the WP Admin › Settings › AdAce menu.
The plugin provides some default ad locations ready to insert ad codes (like "Beginning of Post" or "right before the last Paragraph"). Additionaly the theme registers the following locations:
| # | Location | Ad format | Notes |
|---|---|---|---|
| 1 | Before header theme area | horizontal | |
| 2 | Before content theme area | horizontal | |
| 3 | Before "Related Entries" section | horizontal | An ideal location to utilize some Content Discovery Platform, like Outbrain or Revcontent |
| 4 | Before "More From" section | horizontal | |
| 5 | Before comments area | horizontal | |
| 6 | Before "Don't miss" section | horizontal | |
| 7 | Inside grid collection | rectangle, vertical | |
| 8 | Inside list collection | rectangle, horizontal |
Create ad
To create ads please follow these simple steps:
- Go to the Ads panel
- Click the Add New link

- Ad Title
- Ad Type - custom ads (for example your own image or AdSense)
- Shortcode - paste into the post to display the ad
- PHP Code - for use in your custom templates
- Do not use as random ad - when you set an ad location to display random ads, this ad will be ommited
- Groups - similar to post categories, you can assing ads to ad groups
- Order - when displaying ads from a group, ads with higher order will be displayed first
- Image - the image to be used
- Link - the URL the ad is supposed to link to
- Code - HTML/ JavaScript code for your ad. If used togheter with image, the image is displayed above the code
- Turn off this ad on particular devices (you can set resolution breakpoints for devices in Settings › AdAce Options › General
Custom ad settings
Disable on devices
AdSense settings

- Paste AdSense code here and it will be automatically imported into the settings below
- AdSense Slot id
- AdSense Publisher id - paste into the post to display the ad
- Ad type responsive ads stretch automatically to their location, fixed size ads have sizes set in pixels
- Main ad size to use on all resolutions
- Custom ad sizes for devices - you can set the ad size per device, if not set the main size is used
Assign Ad
To create ads please follow these simple steps:
- Go to the Settings › AdAce Options › Ad Slots panel
- Select the ad slot to assign to
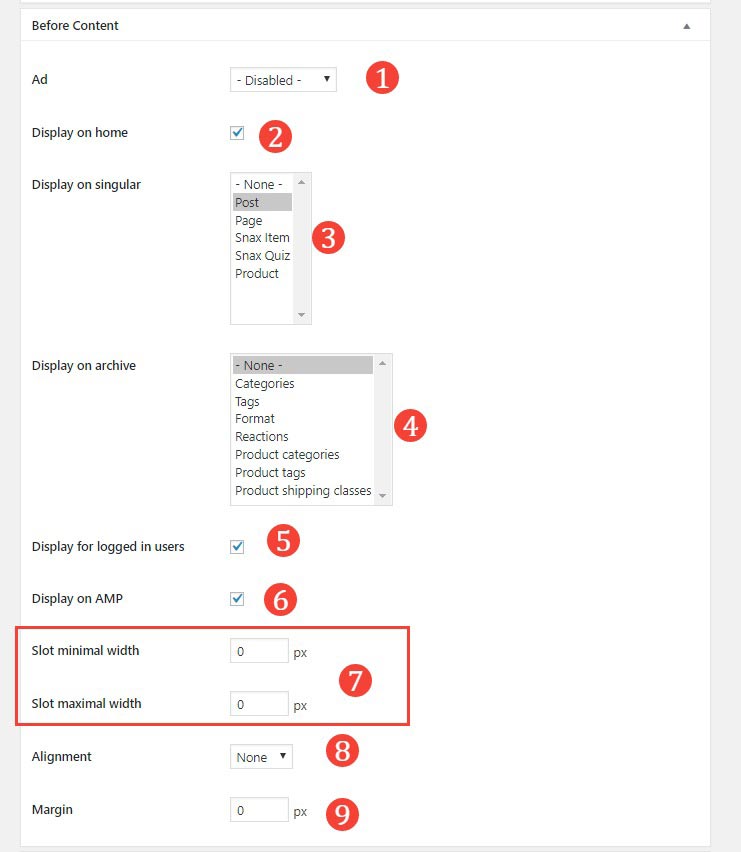
- Ad selection - you use any of your ads or a random ad. For repeating slots (inside collections) you can use the Group setting to sequentially display each ad from the group. For random ads you can use all ads or only ads from a group
- Display on home - if unchecked, the ad will not be displayed on the homepage
- Display on singular - you can choose the post types for which the ad will be used on the single post view
- Display on archive - you can choose the taxonomies for which the ad will be used on the archive
- Display for logged in users - if unchecked, the ad will not be displayed for the logged in users
- Display on AMP - wheter to display the ad on Accelerated Mobile Pages
- Minimal sizes - the slot will be stretched to fit this minimal size
- Alignment of the contents of the slot
- Margin to be used around the slot
Some slots might have some slightly different controls, depending on it's usage.
Ads on the homepage
AdAce allows you to inject ads into your homepage post colletions.
To set it up please follow these simple steps:
- Go to the WordPress Admin › Appearance › Customize panel
- Switch to the Home › Main Collection section
- Scroll down and set the Ad option to "inject into post collection"
- Inject ad at position determines which position the ad will take (for example position 4 means it will be injected after post 3)
- Repeat ad after each X positions allows you to repeat the ad every X posts.
- You can assign the ads in Settings › AdAce Options › Ad Slots panel. Please use the Inside X Collection ad slots, where X stands for your main collection template. For example if you use "Grid with sidebar" use the "Inside grid collection" slot
Ads in the archive
AdAce allows you to inject ads into your archives, for example category or tag archives.
To set it up please follow these simple steps:
- Go to the WordPress Admin › Appearance › Customize panel
- Switch to the Posts › Archive section
- Scroll down and set the Ad option to "inject into post collection"
- Inject ad at position determines which position the ad will take (for example position 4 means it will be injected after post 3)
- Repeat ad after each X positions allows you to repeat the ad every X posts.
- You can assign the ads in Settings › AdAce Options › Ad Slots panel. Please use the Inside X Collection ad slots, where X stands for your main collection template. For example if you use "Grid with sidebar" use the "Inside grid collection" slot
Ad groups
AdAce allows you assign ads to the ad groups. Then, you can assign those groups to slots for random rotation or display them sequentially in collections.
To set it up please follow these simple steps:
- Go to the WordPress Admin › Ad › Groups panel
- Type in the name of the group and press Add new group
- You can assign ads to groups in ad edition screen (please see above)
- Go to the Settings › AdAce Options › Ad Slots panel
- For any slot you can set the Ad to Random and then below choose the group. The random ads will be only pulled from the chosen group
- For repeatable fileds (for example in collections), you can set Ad to Group. The ads from that group will be displayed one after the other in instances of the slot
- You can affect the sequence of the ads displayed using the order setting in the ad edition screen (please see above). Ads with the same order will be ordered by date
Sponsors
AdAce allows you to monetize your site by adding sponsor branding to your content.
To set up the sponsored content please follow these simple steps:
- Go to the Posts › Sponsors panel
- Create a sponsor by setting the sponsor name and optionally a description and a logo
- Go into post editor and use the Sponsor section on the right side to choose a sponsor for the post
- Go to the Settings › AdAce Options › Sponsors panel
- Select the mode of display for sponsor before and after the post
Use other ads plugin
The theme by default uses the AdAce plugin for displaying ads on your site.
But of course we are aware that you may want to use other plugin, especially if you use it on your other sites.
Our plugin is not tightly coupled with the theme so you can easily replace it with your own.
How to integrate other plugin?
All you need to do is to override ad template files with your code (shortcode, widget, custom HTML/JS).
You will find all templates inside the THEME_ROOT_DIR/template-parts dir, each has the ad- prefix.
Example
Let's say you have ads plugin that delivers [my_ad] shortcode to display your ad.
Assume also that you want to replace the top most header ad. To do so, please follow these steps:
- install and activate the theme child theme (if you don't have it)
- copy the template-parts/ad-before-header-theme-area.php file to the child theme template-parts/ dir
- open the file and replace its entire content with this code
<php echo do_shortcode('[my_ad]'); ?>
Procedure for any other ad location (before content, inside grid etc) is exactly the same. Just the template to replace is different.
How to ad a custom ad slot?
Please make sure you're using the child theme and put the following code in your child theme's functions.php file:
adace_register_ad_slot(
        array(
            'id'   => 'bimber_custom_ad_id',  //replace 'ad_id' with your chosen id
            'name' => esc_html__( 'Ad name', 'bimber' ), //replace 'Ad name' with your name
            'section' => 'bimber',
        )
    );
You can then use this slot in any template using the following code:
if ( bimber_can_use_plugin( 'ad-ace/ad-ace.php' ) && ( adace_is_ad_slot( 'bimber_custom_ad_id' ) ) ) : ?>
    <div class="g1-advertisement g1-advertisement-bimber_custom_ad_id">
        <?php echo bimber_sanitize_ad( adace_get_ad_slot( 'bimber_custom_ad_id' ) ); ?>
    </div>
<?php endif;